How to Optimize Images for the Web
Images are one of the primary factors behind slow website load times. Optimizing your images can lead to significant and immediate speed wins.
In this article you'll learn how you can optimize your images to boost your site loading speed. This is information you can move forward with today.
Why Is Site Loading Speed Important?
A slow-loading website will sink your conversion and earning potential because it delivers a poor experience to the user. Users bounce in droves from sluggish websites.
Site loading times are a search engine ranking factor too. A slow-loading site may also damage your SEO, diminishing site traffic and surrendering leads and prospects to your competitors.
It also causes much of your marketing spend to be wasted. What’s the point of spending thousands of dollars in promotion when your users can’t get a mobile version of your site to fully load quickly? It's possible to be progressing in your marketing on some fronts while actively undermining your site performance, SEO, and business results.
The majority of mobile websites are “slow and bloated with too many elements" says Google.
Research by Google and other industry leaders has long established the link between site loading speed and engagement, conversions, and ROI.
Here are some representative data points:
- A 1-second delay in page load time can decrease conversions by 7% or more. (Source: Akamai)
- "A one second delay in page load times can impact mobile conversions by up to 20%" (SOASTA The State of Online Retail Performance, 2017)
- “As page load time goes from one second to 10 seconds, the probability of a mobile site visitor bouncing increases 123%.” (Google/SOASTA research, 2017)
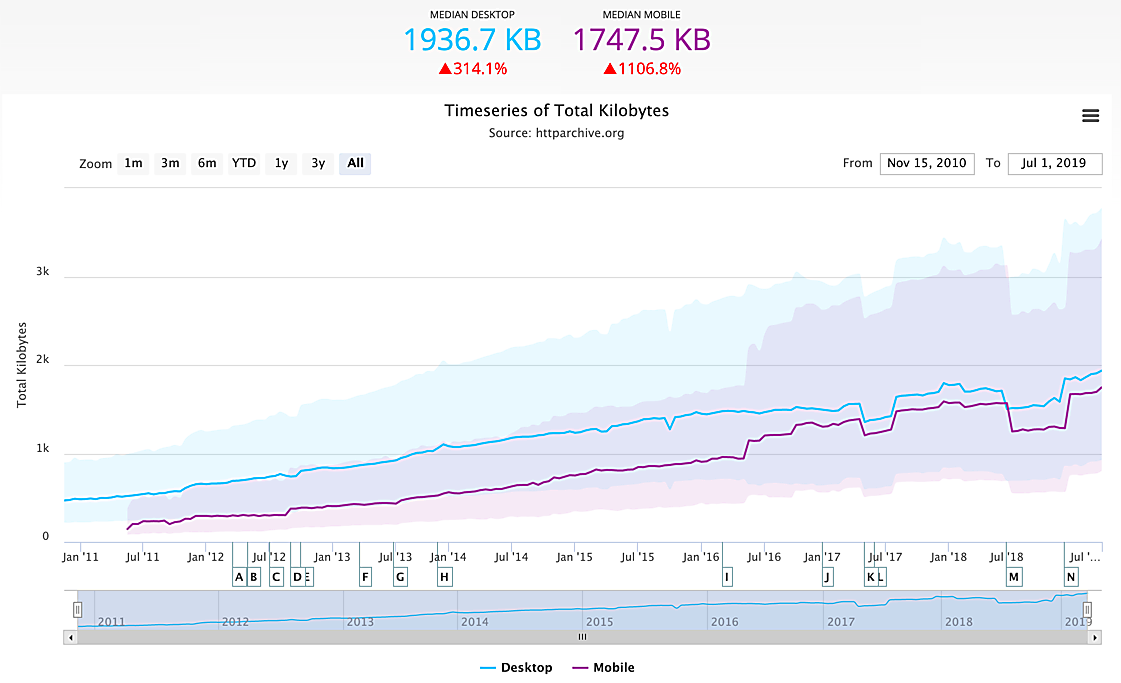
The website 'obesity' trend, captured in numbers by the HTTP Archive. Since 2011, average web page sizes have increased by over 1,100%.
What Is Image Optimization?
Image optimization is the practice of minimizing image file sizes while preserving visual quality. By minimizing the file size, the image — and web page — will load faster.
Typically a balance is in play: the file size must be reduced while maintaining good visual quality.
Don't confuse file size with display size. We'll be using techniques that reduce the file size but don't affect the display size.
"Speed is a ranking factor for both mobile and desktop search results." — Google, 2018
There are many methods of image optimization and it's a highly technical field. For this article, we're going to focus on easy wins and address the non-technical audience.
Our focus is to get actionable information in your hands that you can start using today to improve your website's performance.
Your Website Needs to Be on a Diet
Website owners and users have gotten used to the ease of article posting. It only takes seconds to post content to a website. Unfortunately, as a result, the images that are posted often receive little thought.
If you allow visual appeal to be the only deciding factor for images that get posted to your site, you'll soon bog down your website's performance.
To give your business the best shot at success, incorporate a new discipline regarding how images are handled on your website.
Downloading Free Images
Free images supplied by sources like Unsplash are popular with site owners. These images from professional photographers are high-resolution and gorgeous, but the image file sizes are usually enormous.
I've downloaded images from Unsplash that have been as large as 8 MB in size. Uploading images like this to your website is like tying a boulder around it and tossing it into the ocean. It's going to sink your page loading time, which degrades user experience, SEO, traffic, conversions, and ROI.
So what to do?
Three Methods of Optimization
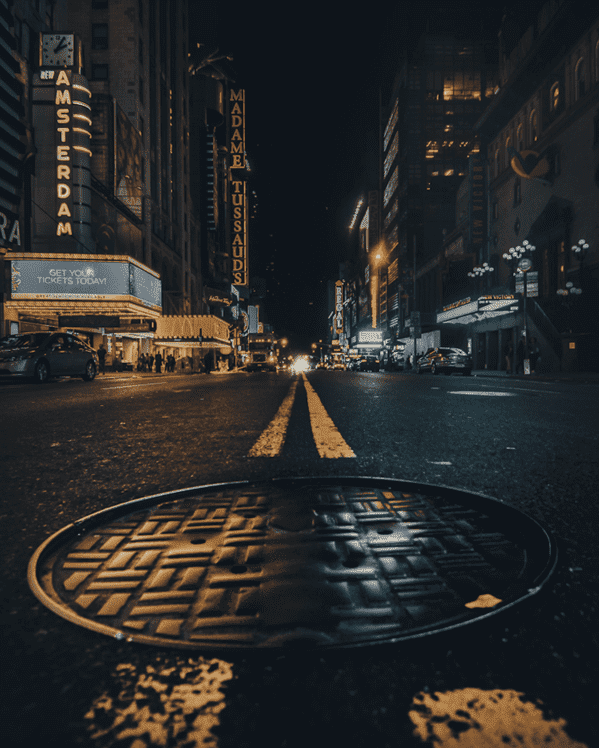
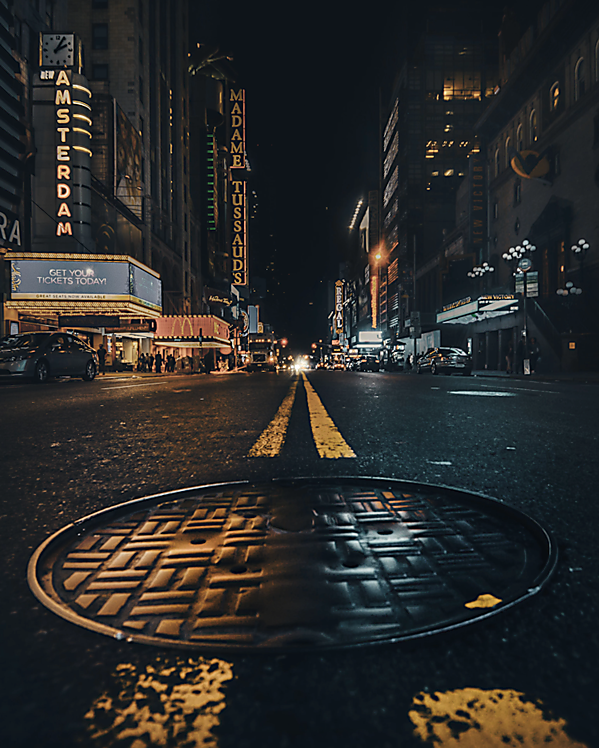
We're going to explore 4 main methods for optimizing images, using a sample image of New York City that has a file size of 2.2 MB.
You can see the results up front in this comparison chart. The use of the Cloudinary optimization service delivers the biggest file reduction, reducing the photo file size down to 74 kb: a reduction of approximately 96%.
| Original download | Editing to column width | Tinypng tool | Screen grab | Cloudinary | |
|---|---|---|---|---|---|
| Image size | 2.2 MB | 1.1 MB | 822 kb | 740 kb | 74 kb |
| % reduction | — | 50% | 62% | 66% | 96% |
Optimization Method 1: Use a Photo Editing Tool
For our example, I'll use an image of New York City from Unsplash, with a file size of 2.2 MB (megabytes)
- Editing to column width: After you download the image to your desktop, upload it to an image editor (like Sketch or Photoshop) and adjust the width to your website's column width and save it. (Wondering what your column width is? Most article column widths are between 650 px and 750 px on desktops.)
- After editing the NYC image, the file size is reduced by 50%. But the file is 1.1 MB. Still too large.
Optimization Method 2: Use an Online Compression Tool
You can use an online compression tool like tinypng.com to reduce the file size of your images.
- Online compression: Download the image then upload it to tinypng.com. This website will automatically compress your file size to make it smaller. After it does its compression magic you have to download the image from tinypng.com.
- Used on this NYC photo, we wind up a file size of 822 kb.
A word of caution though.
- Some high-res images from sources like Unsplash have such large file sizes that even after using tinypng.com you're still stuck with a file size at or over 1 MB which is just too large for a 'non-obsese' website.
- tinypng.com can only take file sizes up to 5 MB.
- You can use compressor.io for file sizes over 5 MB. But if you go this route, you may find yourself having to run them through tinypng.com afterwards, to try to tamp the file size below 1 MB. That may or may not work, depending on how large the file size was to begin with.
This is why I recommend the simple screen grab method (discussed next) for non-technical folks: it's fast, it's not fussy, and it works.
Optimization Method 3: The Screen Grab
This is probably the easiest and most impactful method for non-technical people to use. Here's how it works.
- Download the image to your desktop.
- Instead of uploading it to your website, open the image on your desktop.
- When you open it on your desktop resize the image window to roughly match the column width of your blog or article page. Just eyeball it. It doesn't need to be exact. Resize it until it looks like it spans the full width of your article/blog column in desktop view. Then take a screengrab of it using a tool like SnagIt or the screengrab tool that comes with your Mac or PC.
- Upload the screen grab (instead of the original image) to your website.
The screengrab is going to be a much lighter file size than the original.
However the screen grab isn't ideal. It's a compromise: it's much better than uploading huge image files to your site but it doesn't deliver the best results.
Optimization Method #3: Cloudinary or Imagekit
When it comes to biggest impact on site loading time and low resources needed to get the job done, using an optimization service like Cloudinary or ImageKit wins hands-down.
Here's the same image optimized by Cloudinary.
Next-Gen Formats
One thing that Cloudinary and ImageKit do is to deliver images in what "next-gen" formats. Next-gen file formats like WebP, JPEG XR, and JPEG 2000 load faster than 'traditional' JPG and PNG files.
Cloudinary automatically detects the browser (and browser version) that a web visitor us using to access your site. If that browser can support next-gen images, then Cloudinary will display your site's images in that format to that individual user.
In this case I'm using Chrome, and Cloudinary is delivering the image in what's known as WebP format. Our image is now a featherweight file size at only 74 kb. And the visual quality is good.
Learn How to Use Cloudinary
You can learn more about how Cloudinary and ImageKit work in this article.
You have two options when going forward with Cloudinary or ImageKit.
- DIY. This requires basic computer literacy, basic knowledge of navigating files and folders, and basic knowledge of HTML.
- Hire a web professional to do it for you.
While a pro can optimize all your existing images, you'll need to determine how you'll handle posting to your web in the future. What will be your protocol for handling images?
It may be that a hybrid approach works for you: (1) having all the images on landing pages and any conversion-oriented pages optimized, as well as images in your blog archive and (2) having staff who post to your site use the screengrab method for the future.
Summary
Optimizing your images is an important step to speeding up your site loading time and maximizing conversions and engagement.
I've shared three possible approaches, one delivers the best results. Which one will you choose?
Let me know how you're getting on with your image optimization. And feel free to contact me with any questions you may have.
Related Resources
How to Use Cloudinary to Optimize Your Images
Get started today reigning in your website bloat.
City photo by Yeshi Kangrang